Understanding Macro Photography: What You Need to Know
Macro photography is a technique that allows images of objects to be captured in extreme detail, usually at a scale of 1:1 or more. This photographic style is ideal for those who want to explore the tiny world that often goes unnoticed, such as insects, flowers, or surface textures. To achieve impactful results, it’s critical to understand a few key aspects.
Essential Equipment for Macro Photography
- Cameras: The use of DSLR or mirrorless cameras with the ability to adjust aperture and shutter speed is recommended.
- Macro Objectives: Investing in a specific macro lens is crucial, as it allows you to get closer to your subjects without losing image quality.
- Tripod: To prevent movement and ensure stability, a tripod is indispensable when shooting in low-light conditions.
In addition to equipment, it is important to master lighting and composition techniques. Natural light can be your ally, but artificial lighting is often needed to bring out specific details. It is also advisable to practice with different angles and distances to find the most attractive perspective.
Technical aspects in macro photography
In macro photography, depth of field is a critical element. Since the distance between the camera and the subject is very short, the aperture of the aperture must be handled correctly to prevent parts of the image from being out of focus. Typically, using a smaller aperture (higher f-stop) helps increase sharpness throughout the image.
Choosing the Right Macro Lens for Your Smartphone
When it comes to capturing detailed images of small objects, such as flowers or insects, choosing the right macro lens for your smartphone is crucial. These lenses allow for significant magnification, revealing details that would normally go unnoticed. There are several options on the market, and each one has unique features that can influence your photographic results.
Types of Macro Lenses
- Clip-on lenses: They easily attach to your smartphone camera and are very portable.
- Brand-specific lenses: Designed for certain smartphone models, they offer better image quality and fit.
- High-end accessories: These options typically include interchangeable lenses with higher magnification and better optical quality.
When choosing a macro lens, consider factors such as aperture, which affects the amount of light that enters, and wide focus range, which allows images to be captured at different distances. Also, check the compatibility of the lens with your device to ensure a proper connection and avoid vignetting issues.
Recommendations and Tips
For the best results with your macro lens, it is advisable to use a tripod or stabilize your smartphone, as any movement can affect the clarity of the image. Also, explore the option of additional filters that can improve the visual effects and quality of your photographs. Test and adjust the distance and lighting until you find the perfect match for your needs.
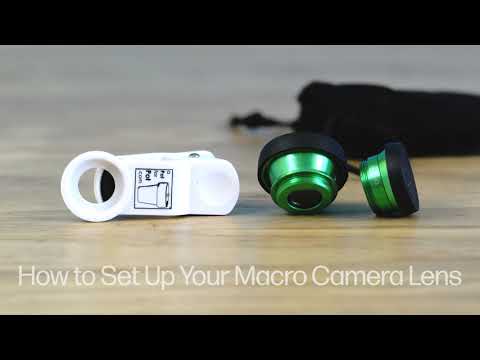
Step-by-Step Guide to Setting Up Your Smartphone Macro Lens
Using a macro smartphone lens can transform your photos, allowing you to capture details that would normally go unnoticed. Here’s a step-by-step guide to setting up your macro lens and start exploring the fascinating world of close-up photography.
1. Select the Right Macro Lens
Before you get started, make sure you choose a macro lens that’s compatible with your smartphone model. Previous investigations may include:
- Lens Type: Make sure it’s of optical quality.
- Mounting: Check if it connects magnetically or by clip.
- Size Compatibility: Make sure it fits your camera.
2. Place the Macro Lens on your Smartphone
Once you’ve selected the right lens, it’s time to install it. Align the lens in front of the object on your smartphone’s camera . Make sure it’s centered to avoid distortion in the images. If you use a clip-on lens, simply attach it and secure it securely.
3. Adjust Your Camera Settings
For best results, adjust your smartphone’s camera settings. Consider the following points:
- Manual focus: If your smartphone allows it, use manual focus mode for accuracy.
- Lighting: Make sure you have enough light, as macro photography may require more light than normal.
- ISO settings: Keep the ISO low to avoid noise in the image.
After making these adjustments, you’ll be ready to start capturing stunning macro photos with your smartphone.
Tips for Capturing Stunning Macro Shots with Your Smartphone
Capturing stunning macro photos with your smartphone is easier than you think. Here are some recommendations to maximize the quality of your images and highlight the smallest details.
1. Use natural light
Light is a crucial factor in macro photography. Whenever possible, take advantage of natural light to illuminate your subject. Make sure the light is behind or next to your object to avoid harsh shadows.
2. Approach without fear
Smartphone cameras have an impressive ability to capture close-up images. Don’t be afraid to get too close to the object you want to photograph, as this will allow finer details to be more apparent.
3. Use a tripod or stabilizer
Even the slightest movement can ruin a macro photo. Use a tripod or stabilizer to hold your smartphone steady while taking the shot. This will help prevent blur and achieve sharper images.
4. Experiment with editing apps
After capturing your images, take advantage of editing apps to enhance color and contrast. Tools like Snapseed or Adobe Lightroom can help you highlight details and bring your macro photos to life.
Common Problems and Solutions When Using a Macro Lens
1. Limited Depth of Field
One of the main difficulties when using a macro lens is the limited depth of field. This can result in out-of-focus areas that distract from the main subject of the image. To fix this problem, consider using a smaller aperture (higher f-number). This technique will increase the depth of field, keeping more elements in focus within your frame.
2. Difficulty Focusing
Precise focusing is critical in macro photography, but it can be tricky due to magnification. A slight movement can cause you to lose focus. An effective solution is to use a tripod to stabilize the camera and prevent unwanted movements. In addition, you can opt for manual focus, allowing you to more precisely adjust the focus on the subject.
3. Insufficient lighting
Lighting is crucial in any form of photography, but it becomes especially important in macro photography. Small subjects are usually in places where natural light may be limited. To overcome this, it is recommended to use external light sources, such as light rings or focus flashes, which provide the necessary illumination to bring out the details of the subject.
4. Problems with Distortion
Some macro lenses can cause distortion in images, especially at the edges. To minimize this effect, you can opt for high-quality lenses and use the lens correction available in many photo editing programs. Also, always check the lens specifications before making a purchase to make sure it meets your expectations about distortion.